Category Archives: Classic

AmigaOS 4.1 Update 5 Released

AmigaOS 4.1 Update 5 has now been released.http://upload.wikimedia.org/wikipedia/en/0/05/Boingball.png

More details and a place for registered users to download the update can be found at Hyperion’s main web site.

The following AmigaOS platforms are supported:

Besides the usual bug fixes, some highlights include:

  • Optimized DMA copy routines for 440ep and 460ex based platforms.
  • SM502 audio driver and Mixer for AmigaOne 500 systems (460ex).
  • Updated Radeon, R200 and Permedia2 Warp3D drivers. Per-application configuration is now possible to help work around bugs in old software. User documentation is provided on the wiki.
  • Catweasel driver for floppy disk, SID chip and joystick support.
  • MIDI support now included via the camd.library.
  • Professional photograph backgrounds provided by mediacube.
  • Improved Amiga 68K emulation. A full Workbench 3.1 installation is now included. Authentic Amiga ROMs and Workbench files are provided in the new Emulation drawer.

AmigaOS support is available via Hyperion’s support forum.

A special thanks to the AmigaOS development and testing teams for their hard work on this release!

Networking Speed test on AmigaOS 4.1 Classic

I did some testing on the available Ethernet adapters for AmigaOS 4.1 and compared them against AmigaOS 3.9.  Read below for the test results!

Hardware Setup

Amiga Technologies A4000T
phase 5 Cyberstorm PPC with 233MHz 604e and 50MHz 68060
128MB RAM
Deneb Zorro III USB Controller – PIO mode in AmigaOS 4.1, DMA mode in AmigaOS 3.9
D-Link DUB-E100 100Mbit USB Ethernet Adapter
Elbox Mediator A3/4000T
Realtek 8029 based PCI network card 10Mbit
Realtek 8139 based PCI network card 100Mbit
Sapphire Radeon 9250 256MB PCI graphics card
ESS Solo-1 PCI sound card
Dual Boot AmigaOS 3.9 and AmigaOS 4.1 Classic Installed

Testing Methodology

For each test a large file was ftp’ed from a local ftp server into the Amiga 4000T’s RAM disk. Three different files were used – a 10MB file, a 40MB file, and a 102MB file.  The transfer rate at the end of the transfer was recorded for each test.  There was a normally a higher “peak” transfer rate, but since that was not sustained, I recorded the more realistic number at the end of the transfer.

FTP Client Used

I used the fastest client I could for each test.  Under AmigaOS 4.1 it was the included command line ftp program.  In AmigaOS 3.9 the AmiFTP client was fastest.  The included Genesis command line ftp client was very slow for some reason under AmigaOS 3.9.

TCP/IP Stack

AmigaOS 4.1 Classic is using RoadShow
AmigaOS 3.9 is using Genesis 68020 version

Operating System Notes

Stock AmigaOS 4.1 Classic install using DHCP.

AmigaOS 3.9 BB4 with MAPROM feature of Cyberstorm PPC enabled.  In addition, two tests were performed on each ethernet card with TLSFMem enabled.  TLSFMem is designed for AmigaOS 3.x only.   If you don’t know what TLSFMem is you can find information about it on Chris Hodges’ site here.

Results

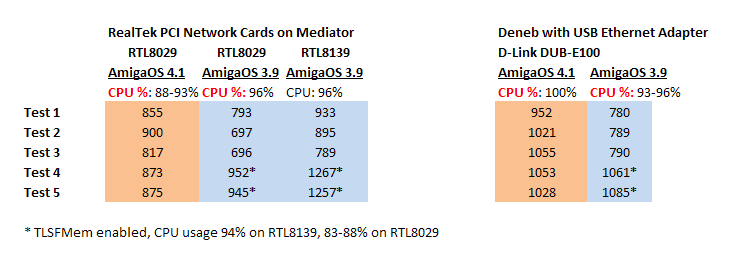
OK, on to the results!  As you can see enabling TLSFMem under AmigaOS 3.9 makes a huge difference.
Not only does it lower by a little bit the CPU usage, it significantly increases the transfer rate and the overall system feels faster.

You can see the difference in speed between the RTL 8029 and RTL 8139 network cards on AmigaOS 3.9 and AmigaOS 4.1 Classic in the chart below.

Under AmigaOS 4.1 Classic, the RTL8029 can reach 900 KB/sec and peak above that.  Using the USB adapter connected to the Deneb, you can get an even higher 1MB/sec.  There is very little difference in CPU usage in PIO or DMA mode on the Deneb – approximately 5% give or take.  Transfer rates are faster under AmigaOS 4.1, except when TLSFMem is enabled on AmigaOS 3.9.

Those of you worried about the speed of the RTL 8029 PCI network card under AmigaOS 4.1 Classic can be assured of solid 10Mbit performance.   Using a 100Mbit network card on AmigaOS 4.1 Classic wouldn’t really buy you much because the Classic systems aren’t fast enough to drive much beyond 1MB/sec.

All results measured in KB/sec (Kilo Bytes per second).

Ethernet Speed Tests

AmigaOS 4.1 Classic – Latest Update!

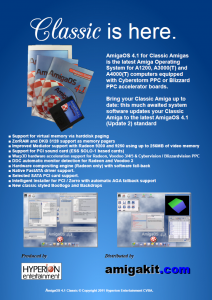
Hyperion Entertainment CVBA and AmigaKit.com would like to give you a sneak peak at the upcoming print advertisement for AmigaOS 4.1 Classic that will appear in the next issue of Amiga Future magazine.

AmigaOS 4.1 Classic Advertisement

Look for a full review of AmigaOS 4.1 Classic in the next issue of Amiga Future,  and other reviews on popular Amiga websites and forums around the world in the next weeks.

AmigaOS 4.1 Classic is immediately available from your local Amiga dealer or direct from AmigaKit.com’s webstore.   AmigaKit is stocking a number of compatible PCI cards and other accessories to complement your Classic setup.

SATA 4-Port Raid card for Mediator
10Mbps PCI Network Card (Mediator)
Radeon 9250 PCI 128MB Graphics Card
Subway USB

and 128MB Memory modules for Blizzard PPC.

A hardware compatibility list has been started and will be expanded as new hardware is tested.  It can be found here.


Hyperion Entertainment and AmigaKit.com wish to thank all users for their support!


Note: AmigaOS 4.1 Classic requires an Amiga 1200, 3000(T), or 4000(T) Computer with  a Blizzard PPC or Cyberstorm PPC accelerator.   The use of PCI cards is optional.  PCI cards require either an Elbox Mediator PCI Busboard or Maytay Prometheus PCI Busboard.  Check the hardware compatibility list for further information.

Tales from an AmigaOS 4.1 Developer…

In the words of Dr. Nick, “Hello everybody!”…

I suppose I better start by introducing myself.  My name is Karl Churchill whom you may know as Karlos from one or more of the various Amiga forums.  I’ve been an Amiga enthusiast since I first had a go of a friend’s A500 back in 1988.  I didn’t actually own one until 1992, but from then on, I’ve not been without one.  I’ve been asked to write a few words about my involvement with OS4.1 for classic.  Well, there’s the short version and the long version.  The short version is that I’ve been working as a contributor to add Warp3D support for the Permedia2.  Work began in October last year as an evening project.

The version of the driver in the repository had not been touched in the best part of a decade and whilst it compiled, that was all it did.   Any attempt to launch a 3D application would simply freeze the machine.   The first challenge was to get it to a point where it would at least allow an application to start, even if it didn’t render anything.  Working on low-level code is not without it’s complications.  Thankfully, the kernel provides a debug printing service but I don’t have a serial line debugger (the serial port on that machine is not entirely reliable) so every time there was a crash, I’d have to reboot and run DumpDebugBuffer to see what had blown up.  Progress was slow at first, but eventually I was rewarded with a blank screen and not a DSI.  Over the following months I got all the basic drawing routines up and running, starting with the basic V1-V3 API calls.  Along the way, I found some amusing undocumented bugs in the Permedia2 that were the cause of a lot of head scratching and finally I got up to the point where I could implement the V4 API.  This is where everything changes and is a good time to start the “long” version of the story… as if this one wasn’t long enough already!

Back in 2001 or so, I was developing my own applications that were using Warp3D as an “advanced rasterizer” for 2D.  If you’ve ever used RTG as a developer on OS3.x, you’ll doubtless be as dismayed as I was with the extent of it’s hardware acceleration.   The functions provided by Warp3D were much more capable and efficient for 2D graphics work. Warp3D 4 was released and introduced it’s vertex array functions.  For what I was doing at the time, these were perfect.  I refactored my code to use them and then discovered to my dismay that various chunks of the advertised API just weren’t implemented by the driver, especially line and point rendering.

I badgered Hyperion about this at the time who were busy with other things but responded by giving me access to the source. It’s fair to say that after a few months, I had the only driver that implemented every drawing operation the API specified.  The original V4 functions used templates (i.e. C macros) to generate a drawing function for each possible combination of primitive and supported vertex format.  Conceptually, this is the most efficient way of doing it but in reality it produces a lot of code which is mostly redundant and not cache friendly. After adding the extra primitives, the driver had reached an unprecedented size (well over 1MB) which was clearly too big.  The only thing that actually varied from one format to the next is the way in which the vertex data was fetched.  So, I scrapped the existing code and started a new version that has drawing routines for each primitive, but uses a function pointer to invoke a fetcher that is specific to the format being used.  The code was well within acceptable size again and ran considerably faster despite having to make up to 3 indirect function calls per vertex (one for geometry, one for colour and one for texture/fog).

I went on to fine tune this implementation by adding versions of the fetchers that were not only specific to the vertex format but also the currently selected states.  This moves a lot of state-dependent conditional logic out of the fetch routine and as they represent the innermost level of the code, that’s always a good thing.  Eventually, some of theV4 routines were over 2x faster than the original version, depending on the vertex format and state.  Unfortunately, this driver never found it’s way into the wild.  Mostly because I never considered it finished it due to the constant need to tweak and improve it; there was always some new experiment to try.  DMA FIFO transport is still “the one that got away” but I’ve promised to behave and actually release versions this time.  The vertex fetch idea caught on though and became the standard method used for all later drivers, so at least the work wasn’t entirely wasted.  I was later asked if I’d be interested in making an OS4.0 version of it.  Seeing as this meant I’d get to play with something new on my A1200 (the then upcoming OS4.0 classic), I naturally agreed and having got the beta version on my machine started work on it.  Classic 4.0 was very much in beta at that time and I ran into a lot of issues just running it, development using it was even trickier.  Then life took a series of increasingly difficult turns which ultimately left me out of the scene for many years.  OS4.0 for the classic came and went in the meantime.  I had thought things had hit an inflection point when a close uncle passed away suddenly but things reached a new low in 2007 when my mother was diagnosed with a life-limiting illness and passed away just two short years later in the spring of 2009.  She was not to be the last.  By the end of that year, I felt I needed to get back into my hobbies, doing something, anything, would be therapeutic.

So I bought OS4.1 for the inherited A1 that was sat under my desk for about 4 years unused to see how things had moved on since my early experiences with 4.0 beta for the Classic.  Quite a bit, as it happens.  As I got back into it, I got the SDK and started playing about with some code.  And that’s where the long and the even longer versions of the story recombine. This time I have a nice stable machine to do the actual compilation on, which has helped considerably. The present driver for 4.1 has incorporated all the fundamental changes the unreleased v4 driver had and then some; even the old V1-V3 drawing routines now use a set of vertex fetchers, all designed around W3D_Vertex, but optimised for each state combination that has an effect on their operation. The FIFO code has been completely rewritten, as has the state handling. Finally there is as much support as is feasible for the V5 API. Unique challenges this time around are trying to appease some old applications that did naughty things (like poking the context instead of making the proper API calls) without sacrificing too much performance and trying to track down some really persistent bugs. The latter has led to having to work through the main library and even the RTG driver. It’s a frustrating task a lot of the time; you think you nailed a bug, only to discover the “it works for me” phenomenon is genuinely real and the same bug is still affecting other users.  So, back to the drawing board.  Still, seeing Quake3 run on my 20-year old A1200 was fun enough to make it worthwhile.

So, the Permedia2 driver is still in development and won’t be considered final until the various bugs are ironed out.  In a case of history repeating itself, I also noticed that the R200 driver doesn’t draw everything advertised in the API either. I guess I’ll have to look into that one next… 😉

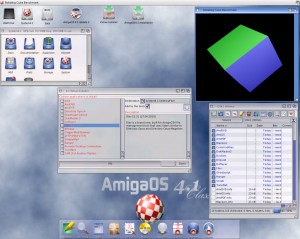
AmigaOS 4.1 Classic Radeon Warp 3D in action!

Carl Moppett, one of our primary AmigaOS 4.1 Classic Beta testers, has put together a short video showing off the Radeon driver in action on his Amiga 1200 system.  It shows Quake 1, some Mini GL demos, and FreeSpace.  Enjoy the video! Link to Youtube below:

http://www.youtube.com/watch?v=8__E99l90Pw

PS – You might also want to see a video of Quake 3 on an A4000 system running AmigaOS 4.1 Classic with a Cyberstorm PPC and CyberVision PPC using the included beta Warp3D hardware accelerated driver from our very tired contributing developer Karl Churchill! Thanks Karl!

Quake 3 – AmigaOS 4.1 Classic on A4000 with CyberVision PPC Warp3D driver

I’d love to see your videos once your copy of AmigaOS 4.1 Classic arrives in the mail!

-Darren

AmigaOS 4.1 Classic now shipping!

Hyperion Entertainment CVBA  and AmigaKit are pleased to announce that AmigaOS4.1 Classic is now shipping!

Where To Buy:

AmigaKit.com (or direct link to AmigaOS 4.1 Classic)

Alinea Computer (Germany)

ACube Systems (Italy)

AmigaOS 4.1 Classic, the long awaited Classic Amiga system update is now available to purchase!  It updates your Classic Amiga equipped with CyberStorm PPC or Blizzard PPC to the latest AmigaOS 4.1 (Update 2) standard and builds on the foundations of AmigaOS 4.0.  This is the first major update for Classic Amigas for three years.

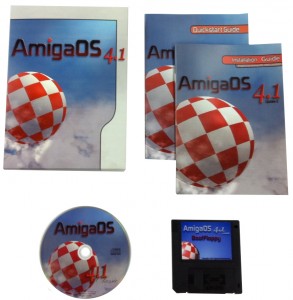
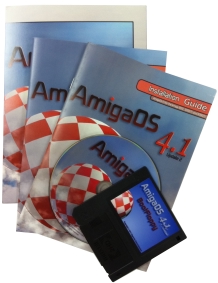
Supplied on Amiga CD with Boot Installation Floppy Disk, two printed manuals and box.  In addition, a comprehensive AmigaOS 4.1 Classic FAQ and File System comparison chart is included on the CD in PDF format.

New Features of AmigaOS 4.1 Classic:

Improved bootloader with large table MMU support
Updated kernel offering increased stability in low memory conditions
Support for virtual memory via harddisk paging
ZorRAM and DKB 3128 support as memory pagers
Improved (future proof) Mediator support with Radeon 9200 and 9250 using up to 256MB of video memory (correct voltage graphics card required)
Support for PCI sound card (ESS SOLO-1 based cards)
Warp3D hardware acceleration support for Radeon, Voodoo 3/4/5 and Cybervision / Blizzardvision PPC (stable beta version for Permedia2-based cards)
DDC automatic monitor detection for Radeon and Voodoo 3
Hardware compositing engine (Radeon only) with software fall-back
Native FastATA driver support
Selected SATA PCI card support
Intelligent Installer for PCI / Zorro with automatic AGA fallback support
New classic styled Bootlogo and Backdrops

The minimum requirements are:

An Amiga 1200, 3000(T), or 4000(T) with Blizzard PPC or Cyberstorm PPC accelerator card
Minimum 96MB memory installed on Blizzard PPC or Cyberstorm PPC
Kickstart 3.0 ROMS
IDE or SCSI CD-ROM drive (on Cyberstorm PPC) for installation
1GB hard disk drive on IDE internal port or Cyberstorm PPC SCSI
Amiga 880K Floppy Disc Drive

The recommended configuration (in addition to the minimum) is:

Prometheus or Mediator PCI BusBoard with a compatible Radeon graphics card* (see Note below)
RTL8029 based PCI Network card
ZorRAM 128MB or 256MB Zorro 3 Memory card (or other compatible Zorro 3 memory card) (Amiga 3/4000 only)
20GB or larger hard disk drive on Cyberstorm PPC SCSI or internal IDE port
256MB RAM (Blizzard PPC only)

*Note: Radeon graphics card support limited to Mediator PCI busboards only at present- this possibly will be extended to Prometheus PCI in future updates.

This update is the result of many months of hard work to bring new life to Classic Amigas.  Special thanks go to Carl Moppett, Darren Eveland, Steven Solie, Joerg Strohmayer, Thomas and Hans-Joerg Frieden, Martin Merz, ACube, Michael Boehmer (E3B), Tobias Seiler, Elbox, and the many AmigaOS 4 developers and beta testers and other contributors to this product.

Hyperion and AmigaKit would also like to thank all Amiga Users for their continued support.  Without you it would not have been possible.  We hope that you enjoy using AmigaOS 4.1 Classic and look forward to the exciting updates that we have planned in the near future!

Hard drive setup for AmigaOS 4.1 Classic

Hi everyone, as we move closer to the release of AmigaOS 4.1 Classic, I wanted to take some time to help you prepare, so I thought I would write this article about how to setup your Hard Disk so you are ready when your CD arrives in the mail!  Make sure you check http://www.amigakit.com and http://www.hyperion-entertainment.biz for the latest news on the release date and ordering information!
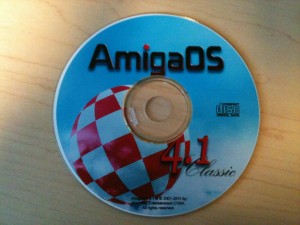
AmigaOS 4.1 Classic pre-production sample Installation Disc

There are a few things you should understand about how the Amiga handles hard disks.  I’m sure many of you are seasoned veterans of the Amiga and already know all of this, but it doesn’t hurt to have it written down clearly.

I’ve broken this article down into several categories to make it easier to read.  After that, we’ll walk through the process of setting up your Hard Disk so it works with AmigaOS 4.1 Classic and boots properly.

The Rigid Disk Block (RDB)

This is basically the “boot block” for the hard disk.  The Amiga will look for the Rigid Disk Block (RDB) at the beginning sectors of the drive.  Inside the RDB is file system information, partition layouts, boot priorities, etc.   In order to boot from a hard disk you must have a RDB.

File Systems

There are three different file systems that are included with AmigaOS 4.1:  FastFileSystem, SmartFileSystem, and JXFS.   Each of these file systems has different types.  For Example, there is FastFileSystem (DOS \ 03), FastFileSystem (DOS \ 07) – sometimes referred to as FastFileSystem 2, SmartFileSystem (SFS \ 00), SmartFileSystem 2 (SFS \ 02), etc.

Each of these “types” of file systems have different characteristics.  Included on the AmigaOS 4.1 Classic Installation Disc is an easy to read table outlining the various characteristics of each of the included file systems.  For now we will keep it simple and say that you will be either booting from FastFileSystem (with long file names) or SmartFileSystem.

Note: For your boot partition you can use FFS or SFS, but many users choose SFS because it is faster than FFS, does not require long “validation” in the event of a disk error , and is more efficient compared to FFS.   Keep in mind, though that FFS has good recovery tools, while SFS recovery options are more limited.  But even with such limitations the speed and efficiency of SFS probably out weighs the lack of recovery tools for most users.

Partitions

Most users divide their hard disks into one or more partitions.  For AmigaOS 4.1 we are recommending at least three partitions.  One for the Operating System, one for a SWAP partition, and one for a Work partition.  Of course you can have many partitions, but for most users three will be sufficient.

Swap Partitions

What is a swap partition?  Well, starting with Amiga OS 4.1 Classic, the Operating System kernel can take advantage of using a ZorRAM memory card, or a swap partition on the hard disk to gain extra memory.  If you only have 128MB on your Cyberstorm PPC (the maximum) you will be happy to know the system can access additional memory by using the swap partition (or ZorRAM card).  Amiga 1200 owners with Blizzard PPC cards are lucky – they can put 256MB of RAM on their CPU cards, which lessens the need for a SWAP partition.  All of this is explained in the Classic FAQ that is included on the Installation Disc so I won’t go into the details here.

Hard Disk Limitations

The device drivers inside the Amiga’s ROM are pretty old now – almost 20 years!  Back then 4GB hard disks were very expensive and not so common.   So we have some limits on where your boot partition can reside.  For AmigaOS 4.1 Classic you must place your boot partition fully inside the first 4GB of your hard disk. If you don’t, your Amiga will most likely crash when it tries to start.  The old device driver in the ROM doesn’t understand spaces beyond 4GB.   But since AmigaOS 4.1 Classic consumes less than 500MB of hard disk space, even a 1GB System or Boot partition is enough.   You will be fine as long as you create your boot partition inside the first 4GB of your hard disk.

Hard Disk Setup

Ok, now that we have the basics down, let’s walk through preparing your hard drive for AmigaOS 4.1 Classic.

When you boot your Amiga with the boot floppy and Installation Disc, you will be presented with a Welcome screen that will allow you to, among other things, start the hard disk  preparation utility to configure your hard disk and partitions.

This is probably the first thing you should do, because when you make changes to your hard disk you will have to reboot to enable the changes.

A word of warning before we continue! Make a backup! You will be adjusting the hard drive partitions, RDB, and file systems, which can mean data is erased. So have your backup completed before doing anything else.

Ok.  Let’s get started then.

After the AmigaOS 4.1 Classic welcome screen appears, select the second option, which is to configure drives and partitions.
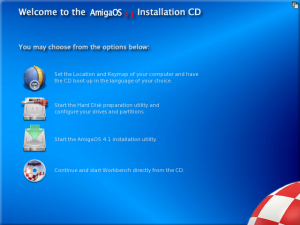
This option starts Media ToolBox, which is the new Hard Disk preparation utility introduced in AmigaOS 4.0.

When Media Toolbox starts, it will ask you to choose your device.  In our example of an Amiga 4000 using the Cyberstorm PPC SCSI controller, you choose cybppc.device.

Note: If you are using an IDE hard drive on the Amiga 4000(T) you would choose scsi.device.  Same for the Amiga 1200.

If you are using a brand new hard drive, never before used, or you wish to erase your entire drive and start fresh, you should click “Edit RDB/Install”, and then “Install/Read configuration…”.    Be Careful here!  This operation will destroy all data on the disk and lay down a new blank drive configuration on your hard disk.  After doing this you will have to reboot, boot with the Boot floppy and Installation Disc again and go back into Media Toolbox to continue.  If you are using an existing hard disk and just want to make space available at the beginning of the drive for your AmigaOS 4.1 Classic installation, just go directly into the Editing of partitions and do not Install a new drive!

Once back in Media Toolbox, select your device, then click on “Edit partitions and filesystems”.  If you have started from your newly erased drive, you must now add a file system to the RDB, add some partitions, and check some other settings.
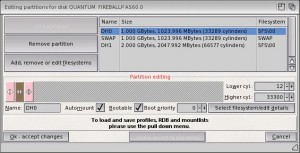
The photo above shows a properly configured drive using the Cyberstorm PPC SCSI controller, a boot partition DH0:, a SWAP partition set to AutoMount, and Work partition, DH1: and lots of empty unallocated space.

Okay, you have made it pretty far! Next you add the file system to the RDB.

Adding a file system into the Rigid Disk Block (RDB)

On the “Editing partitions…” screen, select “Add, Remove, or edit filesystems”.

Click on “Add new FS”

Browse to the L: directory (of the Installation Disc) and choose either SmartFileSystem or FastFileSystem.  Let’s pick SmartFileSystem for this example.  After you pick SmartFileSystem from the ASL requestor, you will be presented with a “Filesystem edit” screen.

It is very important in this screen to type the correct DOSType for your file system! This is one of the most common “gotchas” for setting up your hard disk.   For SmartFileSystem we have to change the “DosType” field from the default of 444f5303 to 53465300.  Once you do that, press enter, and you will see the name become SFS \ 00, which is the proper identifier for SmartFileSystem.
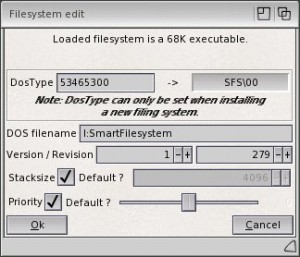
The above picture shows the proper settings for SmartFileSystem.  Note the DosType.

After you have selected the File system, changed the DosType, you can click “OK – Accept Changes”.  The hard part is now done!  The file system has been placed inside the RDB.

Adding your Boot, Swap, and Work partitions

Okay, let’s add your Boot partition.  Click on a blank area of the disk (they greyed out horizontal bar) so it is selected.  Click  “Add partition”.

By default, Media Toolbox will add a DOS \ 03 partition shown in a green colour, but we don’t want that, since DOS \ 03 doesn’t support long file names and won’t work for a Boot partition.  We need to change the File System type to SmartFileSystem.  Click on the “Select filesystem/edit details” button.
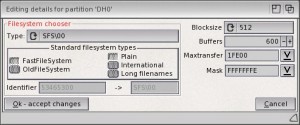
A properly configured SFS partition

In the “Type” chooser select SFS \ 00 from the list.  Change the Blocksize to 512.  Everything else is fine to leave with the defaults.   Click “Ok – accept changes”

You’re back at the “Editing partitions…” screen now and you should see your boot partition taking up the entire drive in the colour pink!  One final – and important step!  Use the arrows to shrink your partition so it resides INSIDE THE FIRST 4GB of your hard disk.  It should be right up against the LEFT edge of the hard disk.  1GB should be sufficient! Look at this photo again showing a Boot partition of 1GB:
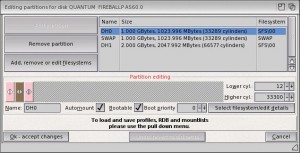
A properly configured drive with Boot, Swap, and Work partitions.  The greyed out area is unallocated.

Next, we verify that the  “Automount” and “Bootable”  options both have check marks as shown in the photo above.  Set the Boot priority to zero.  You can adjust the priority to ensure it has a higher priority than other bootable partitions (if you had any), but if you have no other disks or bootable partitions, zero is fine.

Note: If you plan on having multiple boot partitions for AmigaOS 3.9 and AmigaOS 4.1, ensure they are created INSIDE the first 4GB of the hard disk layout and set a higher Boot priority for the partition you wish to boot from when your Amiga starts.

Adding the SWAP partition

Again, click on a blank area of the disk (the greyed out section), then click on “Add partition”.  You will again see a green area now on the disk, so let’s change the partition type to SWAP.   Click on “Select filesystem/edit details” and change the Type to SWAP.  We don’t have to change anything else, so just click “OK – accept changes”.

Your partition layout should now show a large brown partition.  Shrink it so it is no more than 1GB in size.  Anything more than 1GB doesn’t really make sense.  One final step – set the SWAP partition to “Automount” by making sure the check box has a check mark on it.

Note: At the time of this writing a SWAP partition on the Amiga’s IDE controller (scsi.device) is not supported.  So please do not put a check mark on “Automount” if you are using an IDE hard drive on the internal IDE controller.  This may change in later OS updates.  For the initial release SWAP partitions are only supported on cybppc.device (Cyberstorm PPC SCSI) and hard disks connected to supported PCI SATA controllers.

You are almost done!

Add a Work Partition

The final step is to add a Work partition.  The procedure is the same.  This time we will change the file system to JXFS.  JXFS can handle very large file and partition sizes, – (see the File System Table on the AmigaOS 4.1 Classic Installation Disc for further information – it’s in the Documentation directory).

Note: JXFS partitions are NOT compatible with AmigaOS 3.x!  If you dual boot with 3.x and 4.1 you should choose SFS instead of JXFS for your Work partition.

Click on a blank area of the disk (the greyed out section), then click on “Add partition”.  You will again see a green area now on the disk.  Click on “select filesystem/edit details”. Change the “Type” to JXF4 and the Blocksize to 512.  Click “Ok – accept changes”.  You should now see a purple area on your disk.

That is basically it! Check everything over – verify you have your file system in the RDB, verify you have your Boot partition inside the first 4GB of your hard drive, check that “Bootable” has a check mark for your boot partition, check the boot priority is set to zero unless you have other boot partitions (adjust it accordingly – higher priorities boot first).

Click “OK – accept changes, then click “Save to Disk”.

You will be prompted to reboot your Amiga.

Start again with the Boot Floppy and Installation Disc, and at the Welcome screen you can choose to Install AmigaOS 4.1 Classic.  Set your Locale and keymap settings first.

When you start the AmigaOS 4.1 Installation and select which partition to install on to, double check it’s the right partition (eg. DH0:) and select to format your partition.   “Quick Format” is recommended.  Enable Long Filenames if you are using FastFileSystem.  After the Installation has completed copying all of the files, remove the Boot Floppy and Installation Disc, power off your Amiga, then power back on and your Amiga will boot into AmigaOS 4.1 Classic!

PS – Don’t forget to format your Work: partition once you have booted into AmigaOS 4.1 – it will show up as “uninitialized” disk on the Workbench.
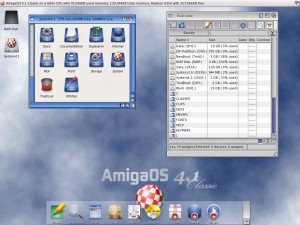
Follow the Post Install instructions to setup your Sound, Network, and Graphics and start exploring!

Darren Eveland
AmigaOS 4.1 Classic Beta Tester

Note: this information is pre-release and preliminary.  Subject to change when the final product ships.

Getting your Amiga ready for AmigaOS 4.1 Classic

So, you have your Amiga with Blizzard PPC or Cyberstorm PPC and you want to get ready for the day your AmigaOS 4.1 Classic CD arrives!  There are a few things you should take into consideration prior to installing AmigaOS 4.1 for Classics.  What should you do to prepare?

1) Let’s talk about the minimum system requirements and the recommended system requirements:

The minimum requirements are:
  • An Amiga 1200, 3000(T), or 4000(T) with Blizzard PPC or Cyberstorm PPC accelerator card
  • Minimum 128MB memory installed on Blizzard PPC or Cyberstorm PPC
  • Kickstart 3.0 ROMS
  • IDE or SCSI CD-ROM drive (on Cyberstorm PPC) for installation
  • 1GB hard disk drive on IDE internal port or Cyberstorm PPC SCSI
  • Amiga 880K Floppy Disc Drive
The recommended configuration (in addition to the minimum) is:
  • Prometheus or Mediator PCI BusBoard with a compatible Radeon graphics card
  • RTL8029 based PCI Network card
  • ZorRAM 128MB or 256MB Zorro 3 Memory card (or other compatible Zorro 3 memory card) (Amiga 3/4000 only)
  • 20GB or larger hard disk drive on Cyberstorm PPC SCSI or internal IDE port
  • 256MB RAM (Blizzard PPC only)

2) Make sure your machine is in good condition.

How much dust is in your machine? Maybe it’s time to clean the inside – and make sure you take anti-static measures at any time you have the case open.  Blow that dust out, get your machine cleaned up, make sure all cards are properly inserted.   Be very careful working inside your machine and if you are unsure about anything talk to your local user group, post on a forum, or contact an Amiga Dealer.  Inspect for any capacitors that may be leaking – they are normally the small round silver and black components.   Amiga 3000 and 4000 users should inspect the battery – the “barrel” shaped component – those can also leak, too.  Many users have chosen to remove the batteries altogether to prevent any possibility of leakage.

Check the fans in your computer.  Are they dust free? Are they making whining noises? Cooling, especially of the PowerPC processor, is critical.  If you have never replaced the fan you may want to consider installing a new fan.   If you are not comfortable doing it yourself, contact your local user group or Amiga Dealer for assistance.  Again, take all and every precaution working inside your computer.  Take your time and don’t make any quick decisions.  Think about everything you are doing inside the case.

Is everything working fine under AmigaOS 4.0 or AmigaOS 3.9?  It will be best prior to installing AmigaOS 4.1 Classic that you know your machine is fully working.  Make sure your floppy drive works.  Can you successfully format a floppy disk?  Can you copy files to your floppy and delete files?

3) Verify your PPC processor is working

AmigaOS 4.1 for Classics requires that all of your hardware is fully functioning.  That means that your PowerPC CPU must be operational.   Some of you may not even know if the PPC chip is actually working.  There is an easy way to test this.  You can download the PPC-Test floppy disk from here: http://powerup.amigaworld.de/index.php?lang=en&page=24.  This is a floppy disk that you can boot from  to test the operation of the PowerPC CPU.  Both tests should come back with “OK” if the PPC CPU is working.

You may already have AmigaOS 4.0 or AmigaOS 3.9 installed.  AmigaOS 3.9 came with optional PowerPC support.  If your existing PowerPC applications are working then you will be fine.

4)  Take some time to think about what partition or disk you will install AmigaOS 4.1 Classic on.

You will have to install on a blank partition, and that partition should be inside the first 4GB of the drive space due to limitations on the original scsi.device of the Amiga 1200 and 3/4000.   Have your partition or drive in mind, and make sure you understand how to set partitions as bootable, how to put file systems on the disk, what an RDB is, etc.   There will be information on this in the “Installation Guide” that will ship with AmigaOS 4.1 Classic.  In the meantime, it may be helpful for you to read up on this now.  There is much information available on this on the various Amiga Community forum websites.  (Don’t worry, the AmigaOS 4.1 Classic Installation Utility will also walk you through this).

5) Think about what hardware you have and if you want to get the best experience possible with AmigaOS 4.1 Classic.

Do you want to use a Radeon card? If so, you will need a Mediator or Prometheus PCI bridge.  Both of these are still for sale as new from Amiga dealers.

6)  Get involved.

Talk to other users.  Share your experiences.   Participate and read the forums – there is a wealth of information on Amigas out there.    We are a small community so everyone’s participation is helpful and contributes to the overall success of the platform.

7) Last of all, have fun!

We are making this release so you can enjoy your machine and keep your Classic up-to-date.  You may move on or up to a Sam 460 or X1000 later, but that doesn’t mean that you can’t still enjoy using your Classic machine for many years to come!

Before I sign off on this post I just want to say “Thank you” to all of the users out there!  Thanks for the positive comments and thank you to the entire Amiga Community for keeping the spirit alive.  Without everyone’s hard work and dedication none of this would be possible!

Darren Eveland

AmigaOS 4.1 Classic Beta testing started

Beta testing of the AmigaOS 4.1 version for Classic Amigas has now started. Participants have been contacted by email. If you asked to participate, but did not get the appropriate email, please contact me again (thomasf@hyperion-entertainment.biz).

AmigaOS 4.1 Classic Promo video (unofficial)

Hi everyone and Happy New Year!  I made a video some time ago about AmigaOS 4.1 Classic to act as a little “teaser” and I wanted to show it here.  It’s not an “official” video, just something put together by me, but in any case I hope you enjoy it!

Again I would like to point out it shows some beta features that may not be in the final version (such as the total memory display in the Workbench Title bar that I am using for debugging/paging tests).

As for the release date, that is always subject to change as we are in the thick of final development now.

I will have further blog entries in the coming weeks as we get closer to the release date of AmigaOS 4.1 Classic.

Here’s the Youtube link to the video:

AmigaOS 4.1 Classic Promo video

Oh, and turn up your speakers! 🙂