Category Archives: Developer Info

Amiga DevCon 2016

blog_devAmiWest 2016 (October 7 to 9) is fast approaching and so is Amiga DevCon 2016 (October 6 and 7). The location is Sacramento, California, USA. Please note, as always, the DevCon is a 100% volunteer effort as is the AmiWest show itself.

Some information about the DevCon from the AmigaOS Documentation Wiki:

  • The anatomy of an Amiga disk device driver. We will be dissecting the p5020sata.device which is a SATA device driver used in the upcoming AmigaOne X5000. This isn’t just any custom made driver. It is melding between Linux libata and the traditional AmigaOS trackdisk device drivers.
  • Hans de Ruiter will be presenting his tutorials on Warp3D Nova. For anyone that wants to program for Warp3D Nova be sure to obtain/borrow/steal a card for the DevCon. See the Warp3D Nova press release for assistance on choosing a card.
  • Personal Projects. You are encouraged to bring your own personal projects to the DevCon where we, as a group, may be able to help you out.

See you there!

DCFS and LNFS Explained

blog_devThe AmigaOS Fast File System (FFS) was created back in 1988 and, believe it or not, is still in use today by some die hard enthusiasts who insist it is still pretty good. FFS has several modes which has enabled it to survive far past its expiry date. Two of those modes have never been described before. That is about to change.

Back in 1992, Randell Jesup added what is known as the Directory Caching File System (DCFS) mode to FFS. This was meant to speed up directory listings on floppy disks. A rarely used and mysterious mode with very little documentation.

Fast forward to 2001 when Olaf Barthel created a FFS reimplementation and added the Long Name File System (LNFS) mode. Up until this point users were stuck with 30 characters due to the original implementation.

Curious? Read all the gory details on the most complete and official AmigaOS Documentation Wiki.

AmigaOS and the Console Development – Part 2

blog_devPart 2 – The Great Console Rewrite

The 68K assembler version of the console had a peculiar architecture. When the console was opened, it allocated display memory 50% bigger than the size of the window (in those days the console had to be passed the address of an existing window when you opened it). That memory was divided up into a character map, Width by Height bytes, and a similar sized array of character attributes. The addressing of the array was really strange and I think it might have been translated into 68K assembler from BCPL.

The new console had to include:
1) A ReAction window and gadgets;
2) History and display scrolling;
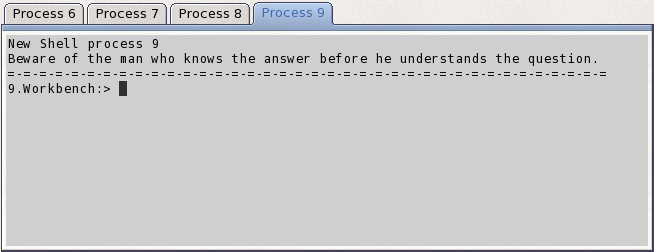
3) Multiple windows (tabbed);
4) Menu;
5) Prefs Settings.

As I mentioned last time, the fixed array size made it impossible to add history features to the architecture. Also, any operation such as an insertion, deletion, window resize or refresh was implemented by unpacking the whole character map and repacking it again. It was designed for a particular architecture and was not adaptable. We decided to use a linked list for the display rows, so that rows could be added or deleted at any time without having to repack a large array. The rows were then allocated and returned to a memory Pool for speed. The independence of the rows made it easy to keep a few pointers to the list, such as “History Start”, “Display Start”, “Display End” and “History End”. Most list operations were simplified by this approach and scrolling speed seemed to be adequate.

The ReAction Window and Gadgets

The old console window was opened by the con-handler and its address passed to the console device. That meant that one program (the con-handler) opened and “owned” the window, but another (the console device) performed all the work on it. That had to change if we were ever going to support memory protection. In any case, it made sense that the program that used the window, opened and closed it also. One of the first changes was that the console device would from now on open and maintain its own window (of course, it still had to accept the address of an existing window passed to it by an old program).

Once the console could open its own window, it could make it a ReAction window with Iconify, Scroll and ClickTab gadgets. If it was passed the address of an existing window, then none of the “extras” could be added since the calling program might have added its own extras, so only “new-style” windows have all the extra gadgets. Now you no longer have to close the Shell when you change Workbench GUI settings!
Most of the gadgets can be independently enabled or disabled by options in the Shell tooltypes.

History and Display Scrolling

One feature of the old design was that a long row could overlap the edge of the display window and “wrap around” onto the next row. You’ve all seen what happens when you make a Shell window narrower – the long rows split into two or more and the text occupies more rows on the screen. To implement this feature with the linked list, we ended up creating “multiple rows” that consisted of two or more rows of text on the screen, but linked, each one to the others on each side. What is more, the new console display had to be able to scroll text on and off top and bottom of the window. The window might even have been resized since the old text was scrolled off the edge, so we had to accommodate changes in window width as old rows of text were scrolled back into view. A lot of work has gone into the treatment of “long lines”!

The current history, consisting of the contents of the linked list of lines, is stored in RAM. In order to save memory, we allow old history to be written out to a disk file once the number of lines of stored text reaches a predetermined limit. You can specify how many lines of text you want to keep in RAM, and what to do once that overflows (e.g. keep it in a disk file or discard it). You can also elect to save the whole Shell session to a file if you wish.

Scrolling the history is easy, you can use the mouse wheel, the scroll bar gadget or built-in keystrokes. If you have selected to write old history to backup files when the current buffer is full, you can even scroll back through the history that has been written to the file. As you do, that history is read back into the current buffer, making it exceed the size limit temporarily. If you like, you can display the number of lines of history in the window title.

Multiple Windows (Tabbed)

Adding a ClickTab gadget to the window makes it possible to switch the display between any one of two or more actual Shells. All Shells share the same window geometry and gadgets, but each has its own independent history and text attributes. You could have one Shell displayed in black on white, another in white on black and others in any combinations you like. When you switch from one Shell to another, the new one is displayed in its own colours and style. You can choose the text to be shown on each tab (you might like to have the current directory, for instance).

From one Shell, you can open a new one by selecting a menu item or a built-in keystroke. The new Shell is a clone of the previous one, that is, it “has” the same current directory, local variables, and so on. However, it is opened using the same “Shell-Startup” file as all the other Shells, so if your Shell-Startup file includes a line like “cd RAM:”, all new Shells will open with RAM: as the current directory.

You can close any Shell individually, or even all at once.

shell-clicktab

Menu

The menu accumulates all the key short-cuts (apart from those for command-line editing) and lets you select or edit settings as you wish. You can also call up the console Help file from the window. The Help file contains all the user documentation for the Shell, the con-handler and the console device. Most of the menu operations can also be performed by built-in keystrokes.

shell-console-prefs

Prefs Settings

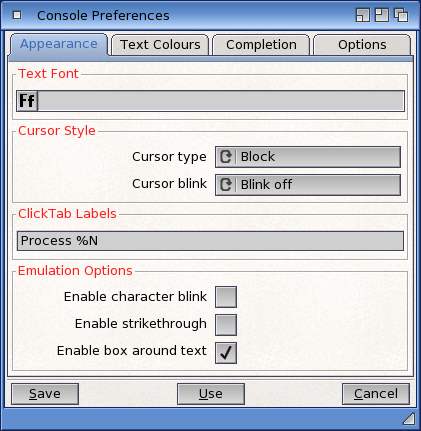
There is a Preferences Editor for the console settings. These are the default settings for the console and can be changed by the tooltypes in the Shell icon or the program running in the Shell window. You can also call the prefs editor from within the console window and “Use” the changes temporarily if you wish.

Appearance

You can select the font for the console text (fixed-width fonts only). You can also choose from a plain old “block” cursor, an underline or a vertical bar. You can make the cursor blink if you like.

Text Colours

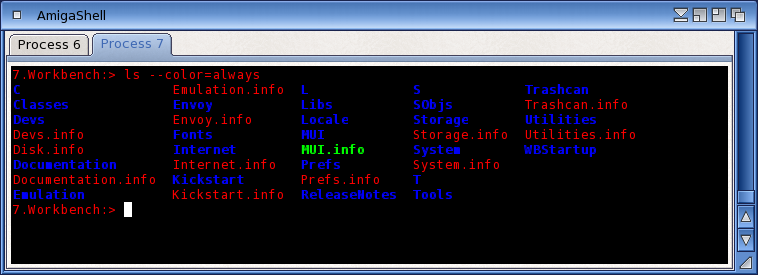
The “old” console was pretty restricted in its choice of text and background colours. You could use the ANSI escape sequences to set colours, but you could only choose from the system Pens. In the new console, we have introduced a palette of colours from which you can choose your text foreground and background colours. There are four palettes available to the user – you can select your preferred palette from the Preferences editor. The four palettes are the old System Pens, an ANSI set of primary colours, an ANSI set of “faint” colours and a “user” set which you can choose to your own preferences.

shell-console-colours

Text Attributes

The new console supports a few new text attributes, like italics, strike-through and character blink. Italics are spaced out slightly so that they don’t overlap with non-italic characters. The console does not attempt to support proportional fonts.

shell-console-attrs

Name-Completion

Name completion strictly is a function of the con-handler, not the console, but it appears in the console window. You can now choose to have name-completion choices displayed in a “popup” window close to where you are typing. You can then choose from the displayed list. If you choose to see completion “in-line”, you can choose if or when you want the system to beep at you (if there are no matches, multiple matches, or “this is the last match”).

Another con-handler setting in the console prefs is the size of the command input buffer. The old console was fixed at 1024 characters, but now you can leave it at 16 kB or set it to anything up to 1 MB.

You can also change the default Tab spacing (Horizontal Tabs, not ClickTab) from its default eight spaces to two, or eleven, or any value between two and sixteen.

Compatibility with Older Programs

The new console works in either its “legacy” style or its “new” style, depending on how it is opened. While testing it, we have discovered several older applications that depended on unspecified console behaviour or even, in some cases, bugs in the old console.

We have tried to keep the new console compatible with the old, but inevitably there will be programs “out there” that will behave differently. Let us know and we will see what we can do.

New applications can use the newer console features and make the most of them.

Programmer Information

All the above description is user information, of course. The AmigaOS SDK contains the full documentation of the new console API. The AmigaOS Documentation Wiki has also been updated with new information about the improved Shell.

Well, that’s it for now. I hope you enjoy the benefits of the new Shell.

AmigaOS and the Console Development – Part 1

blog_devPart 1 – The Ascent from Assembler to C

It was late in 2003 when I received my first AmigaOne-XE. At that time, like many others, I had to be content to use Linux, and I waited impatiently for the day when I could run AmigaOS on my new machine. In the meantime I built the Boing Ball “case” for it. [The XE board failed in 2014 after eleven years of faithful service. These days the Boing Case is occupied by the AmigaOne X5000]

Early in 2004 I was invited to become a beta tester and had the good fortune to be able to run the 68K version of AmigaOS 4 on my A4000. At that stage most of the old AmigaOS software had been modified (where necessary) to compile with GCC, and the developers were mainly using cross-compilers running under Linux or Windows. Many of the system components, originally written in 68K assembler, had already been rewritten in C or translated to C. Only a couple of months later, the first PPC versions of the system components were released to beta testers and 68K versions were dropped, one by one. Only a handful of third-party components remained in 68K, those for which we had binary licenses only (e.g. ARexx).

During a discussion on the beta tester mailing list one day, one of the developers mentioned that only the console device remained to be translated/rewritten in C. Foolishly I waved my hand in the air and said something like “I’d like to have a go at that!”. Well, I had been an assembly-language programmer for probably thirty years and a C programmer for probably twenty, so I thought it might be fun.

You can imagine my excitement when, some weeks later, an archive arrived in my inbox. It was the assembler sources for the console device, all 26 source files and about half a dozen header files. Where was I going to start? I couldn’t just translate the whole thing in one pass, then sit down and attempt to debug it. I had to be able to switch back and forth between assembler originals and C translations, or I would never be able to even make it run, let alone debug it.

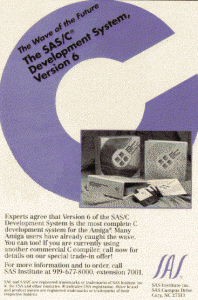
SAS01I decided to use SAS/C, the 68K compiler/assembler package that I had been using for years. Like many other packages, it allows you to mix C and assembler modules freely in the build. I could translate each assembler source file in turn, and with some stubs, call the assembler functions from C or the C functions from assembler. That way I would be able to switch individual modules back and forth between C and assembler at any time. I started by compiling the source on my trusty old A4000, since the A1-XE was by now the beta test machine and the A4000 was the stable development platform. Later, the native AmigaOS 4 version of GCC was released and I was able to compile and build on the A1-XE (it was a bit faster than the A4000, even with its 68060/50 processor!).

Well, the translating job took about nine months. I took each assembler source file and commented out the assembler statements, writing in the C version underneath. Of course, this approach made each source file huge, but it would prove to be a boon later when I was debugging, since I could see the original side by side with my translation. During that time I had to break up some of the assembler source files into smaller modules, just to keep them a reasonable size. I finished up with some 30 C source files.

Here is an extract of part of a translation:

//    lea    cd_RastPort(a6),a1
//    move.b    cu_Mask(a2),rp_Mask(a1)
IGraphics->SetWriteMask(rastPtr, unit->cu_Mask);

//    moveq    #0,d0
//    move.b    d6,d0
//    LINKGFX    SetDrMd
IGraphics->SetDrMd(rastPtr, oldMode);

You can see that the original five lines of assembler have become two lines of C.

The makefile was huge, with half of it commented out at any one time. The SAS/C suite produced 68K code, but from a mixture of C and assembler sources. At first it was all compiled on the A4000, but later I swung everything over to the A1-XE and made that my new development platform.

As the development progressed, there were fewer assembler sources and more C sources, until the first pure-C version was released to the beta testers in May 2005. That version was still compiled by SAS/C and distributed as a 68K binary. There were several more months of debugging and testing, until the pure C sources were compiled into native PPC for the first time in August 2005. At about the same time, the C sources were stripped of the original assembler code and we had a working console device, written in C and compiled in pure PPC. We tested it to destruction and cleared the bugs before it was finally released to the world. Most of the bugs were inconsistencies with the old 68K version, caused by mis-translation or errors in understanding. It had taken a year to translate and debug, but it was a great satisfaction.

The original 68K assembler version of the console occupied 16,212 bytes. Compare that with the last 68K C version (V50.26) which was 42,564 bytes! It just shows how squashed the assembler version was (but that C version did have some debug code as well).

The translated console had several drawbacks. Because the original had been written in assembler, it was very difficult to read and maintain and there were a number of known “features” that were just too hard to fix. Also, the assembler version had been written to minimise code size, rather than to optimise speed or code legibility. There were many tricks employed within the assembler code to save a few bytes of space in the Kickstart ROM. For instance, it was common to arrange several byte-sized variables adjacently in the data area so that four variables could be picked up at once with a long word fetch. Not recognising these tricks was the cause of many a bug in the early days! Also a lot of the ANSI code had been not implemented in order to save space.

Not the least of the drawbacks was that the memory allocated for the display was fixed when the window was opened, and lines of text that scrolled off the top or bottom of the display were scrubbed clean and re-introduced at the other end. It was just not possible to save the scrolled lines to keep the display history. To add a scroll bar and history would need a big rethink of the architecture.

Next time: the Great Console Rewrite.

AmigaOS 4.1 Final Edition SDK now available

blog_devThe AmigaOS 4.1 Final Edition SDK is now available for download from Hyperion’s web site. The official press release can be found at http://www.hyperion-entertainment.biz/

This is a significant update to the SDK which will require a lot of developer support to use properly. New articles have already began to appear on the AmigaOS Development Wiki like Intuition’s new Menu Class article.

We are also planning tutorials and a workshop at the Amiga DevCon 2015 which is before the AmiWest 2015 show in Sacramento, California, USA starting October 15th.

Steven Solie
AmigaOS Development Team Lead

AmigaOS Documentation Wiki and Amiga DevCon 2015

blog_devThe AmigaOS Documentation Wiki (http://wiki.amigaos.net) is moving to a brand new server. The new server is quicker and also enables important upgrades to the underlying software driving the wiki.

It always takes a few days for the DNS propagation to complete so the URL may not work in your region yet. In the mean time, you can use http://78.47.81.180/wiki to access the wiki. You can monitor on the DNS propagation progress using services like DNS Checker.

Amiga DevCon 2015

Moving and upgrading the AmigaOS Documentation Wiki is just one small step towards Amiga DevCon 2015 which is taking place in Sacramento, California, USA on October 15 and 16 before the AmiWest 2015 show. With the release of AmigaOS 4.1 Final Edition there is a need for an updated AmigaOS SDK. The SDK includes some important AmigaOS API improvements and these will be covered at the DevCon and more.

Don’t worry if you can’t make the Amiga DevCon in person. All the presentation materials will be available on the AmigaOS Documentation Wiki in the Tutorials section.

Steven Solie
AmigaOS Development Team Lead

Multicore and Amiga: Present and Future

blog_devSymmetric Multi-Processing (SMP) is on the wishlist of AmigaOS users for quite some time now, and while progress has been made, we’re still not there yet.

To explain the progress, let us first look at the concept, and then point to where we are in the whole.

Concept: Threads, Cores and Processors

When looking at SMP support, we need to take actual processor technology into account. Older implementations used actual physical processors for SMP, that is, one processor could execute one instruction stream, and to achieve parallel execution, you would be able to plug in more processors. Usually and not surprisingly, this is rather limited in the amount of processors that can communicate with each other (although there were massively parallel machines that used a complex interconnection network for communication).

Later on, chip manufacturers added additional so called “cores” to one physical processor.

A very recent development is the ability of such individual “cores” to execute more than one instruction stream in parallel. We call those instruction streams threads. This technology is used in such CPUs as the Intel Core i7 (where it is named hyper-threading), or the Freescale e6500 core, which is used on the T-series CPUs from Freescale (up to the T4240, which has 12 physical cores with two threads each).

How to schedule tasks in SMP configurations

When looking at how to schedule Exec tasks and processes on a SMP system, we need to look at how much overhead is involved with scheduling. Currently, in single-CPU environments, Exec periodically interrupts execution and evaluates whether it should pick another task to run. Doing that with high frequency, say, 20 or 30 times per second creates the illusion of multiple tasks running in parallel.

The evaluation whether a new task should run or not is done based on the tasks priority, or depending on whether the task has something important to do. Of course, this takes time as well, and if the time taken for this evaluation becomes too long, the machine will take more time evaluating what to run than running what it is supposed to.

This gets worse if more execution units are in the system: If the evaluation would also need to ask other CPU cores whether they want to run something, the time for this processing would rise tremendously, to a point where adding more CPUs to the system would actually slow it down.

Therefore, the scheduling of Exec tasks and processes will remain something a single CPU will do for itself, even in multi-core. This will ensure a reasonable time is spent on this task.

So, how do multiple cores, threads and/or CPU’s come into play ?

We can easily monitor how loaded a core is by checking how many of the tasks we have ready actually got time to run. This is called the “load” of the CPU. If it spends a lot of time waiting for tasks to become available, the load is low. If a lot of tasks are waiting for their turn to run, the load is high.

In a multi-core system, some cores will have high load, and some low. To balance this, the system will look at the load of the individual core and determine whether there is a need to balance out the load among the CPUs or not. This balancing is triggered by the individual schedulers when they notice that their current workload is too big for them to handle. In this case, the overloaded core will migrate some of its tasks to other cores until it can again handle its workload.

Scheduling domains

In the previous section, we talked about balancing. Let’s take a closer look at this. A task running on one core is usually using the core’s resources. An important resource is caches: Level 1 caches (L1) contain data from memory very close to the CPU’s instruction units, so accessing this data is instantaneous. A level 2 cache (L2) is something that is below the Level 1 cache, is usually bigger, and access to it is slightly slower than accessing the level 1 cache. Some systems even have higher level caches below the L2 cache.

In a typical multi-core system, the L1 is exclusive to one core, while the L2 is shared among many cores. However, as in the scheduling example, more cores accessing one L2 means more overhead in communication with the L2 because some core might be waiting for another core to finish accessing the L2. The more cores access the same L2, the more likely such a stall is. Therefore, some processors with a high number of cores have multiple L2 with groups of cores sharing that L2 while another group shares another L2. We call those groups “clusters”. As an example, the T4240 has 12 cores, grouped in three clusters of four cores each, with each cluster sharing their own L2 and each core having a separate L1. In addition, there are cores that can run multiple threads at once. These threads even share the L1.

What we see here is a hierarchy of execution units. Clearly, moving a task from one thread to another thread on the same core is a rather cheap operation, the migrated task will not suffer from misses in the L1 since it still uses the same one. On the other hand, migrating from one core to another one means that the new core will not have access to the L1 of the previous core, and thus, migrating to this core will come at a slight initial performance cost. Similarly, migrating across to a new cluster will mean the task will lose the benefit of both the L1 and the L2, resulting in an even larger initial performance cost.

As you can see, moving a task to another execution unit will have different degrees of performance penalties. Note, these are only “initial performance” penalties, since the caches will gather the necessary data over time so that after some time, the caches will be fully available again to the task.

This hierarchy is in essence the hierarchy of “scheduling domains”. Scheduling domains define a cost associated with moving a task from one core to another. When balancing the load, the system will strive to minimize the cost of movement to ensure minimal performance loss. Migrating inside the current scheduling domain will always be cheaper than migrating to some core outside of the current scheduling domain, however, if all cores in the task’s scheduling domain are overloaded, the higher cost will need to be paid.

Pitfalls: The dreaded Forbid

Adding this functionality to AmigaOS is not without problems, naturally. There is one central part of the OS that has been around since its very beginning, and has been widely misused and misunderstood: The Exec function Forbid (and its counterpart, Permit). The problem with these functions is both semantic and practical. It has been documented as disabling task switching, and as enforcing the system to become single threaded.

If you look at this, these are one and the same on a single core system, but something completely different in SMP. Forbidding task switching in an SMP system will have a number of threads running in parallel. No CPU core will switch tasks, since it is forbidden to do so, but the system is not running single threaded at all.

This misunderstanding has lead to a lot of misuse. Forbid has been used to basically protect critical data structures from tampering with by other threads. Of course, this will work in a single core system: Prohibit task switching, and you can be sure that no one else will get to access that data. In a SMP situation, however, this does not stop anyone from accessing it.

So what’s the solution to this ? Keeping in mind that Forbid is mostly used to protect critical sections of code and data, the SMP enabled kernel will treat it just like that: Any core issuing a Forbid call will, simply put, write its number into a field somewhere in the system. It will do this “atomically”, meaning that the memory is only modified if no one else is competing for it. If it succeeds, it can proceed into the critical section. On the other hand, if there is already some other core in the critical section, or the write did not succeed, it will repeat this process until it succeeds, basically stalling the competing core until it is successful. This ensures that only one core at any time can enter into a Forbid state, and any subsequent core that wants to forbid will have to wait until its turn.

Of course, this is a simplified description of the process. Some other things are necessary to ensure fairness and equal distribution of access, to prevent one core from hogging this “lock” for too long, and so on, but the basic process works like this.

Where are we now ?

The development of SMP support has been separated into several distinctive steps. The first step was to rewrite the scheduler in C for easier accessibility. In the very end, this step might be reversed again, rewriting the then SMP capable scheduler back into assembly language. The second, more fundamental step was to decouple the scheduler from its current data structures. As you might know, ExecBase contains a lot of list for task that are ready, or waiting for a signal.

This has now been achieved. The current development build uses a scheduler that no longer uses the original AmigaOS data structures, but a structure that is replicated for each core.

The next step is to have each core in the development system (currently, the X1000) to run the scheduler. Test code will then start tasks on the different cores and see how they behave. We have already experimented with this and the results look promising. The tests basically showed that the lockout mechanism for Forbid works as planned.

As a final step, the balancing will be introduced, which then finalizes the first implementation of SMP support in AmigaOS.

Future plans

There are several possibilities to chose from once the first implementation is done. First of all, the scheduling algorithm is still the same as the one used by current Exec, a priority modified Round-Robin. Naturally, this is an algorithm that can be improved upon. There are several other implementations that come to mind, like the O(1) scheduler, multilevel feedback queues or even the Brain Fuck Scheduler.

Also, the balancing algorithms are candidates for improvement. The system might record scheduling data and compute typical user profiles that can be pre-selected, like, for example, the ability to determine when to balance, and how aggressively balancing is carried out.

AmiWest 2014 Programming Jam

blog_devWe are extremely pleased to be able to host the 3rd incarnation of the AmiWest Programming Seminar. This is a unique event in the AmiVerse, to bring together Amiga developers, programmers and users to learn from each other and create apps.

In previous years we have taken a more formal approach with seminars and fixed topics. Given the wide range of programming experience on the part of participants, we will try a more free-form approach this year.

To read more and get more information, check out this link:

http://www.amiwest.net/aosps/

Here’s the sign up form:

http://www.amiwest.net/survey/index.php/816728/lang-en

Paul Sadlik
AmiWest Programming Jam Organizer

Breaking the Memory Barrier

Overview

AmigaOS is a 32 bit OS. There is little we can change about it. The size of an address pointer is intrinsically entangled into the API, and getting rid of this legacy is, for the most part, a matter of replacing all of the API with a new one. Every time a programmer writes something like “sizeof(struct Message)”, the 32 bit nature is fused into his code.

This has some repercussions that cannot be easily ignored. It means that our address space is inherently limited to 32 bits (meaning 4 gigabytes). In reality this space is even smaller than that. PCI space, the kernel, memory buffers, and other memory areas take up a large chunk of the already limited address space, leaving roughly 2 gigabytes for the applications running on the machine – 2 gigs which also are shared between all of the programs running.

Physical Vs. Virtual

A physical address of a memory block is implicitly defined by its position within the memory chips, and the order in which the modules are inserted into the mainboard’s memory slots. They start at zero and go up to a specific maximum.

A virtual address, on the other hand, is what the CPU and hence the application program sees. They might be the same, but as a general rule, they are different. Virtual addresses are given on the fly, but there is a rule that every memory cell must have a unique virtual address, because all references to that cell are stored as the virtual address the application sees.

Modern systems like the X1000 or upcoming models can take more than 4 gigabytes of memory, but so far, the extra memory will never be used. Even in a 4 gigabyte system, there is memory that will never be touched because there is just no free address; and unfortunately, every byte needs to have its own virtual address, and no two bytes can have the same.

Unless…

Extended Memory Object

Extended memory objects (ExtMem) are a means to access memory beyond the 2 gigabyte barrier by applications that are written to make use of them. In a nutshell, an extended memory object is a chunk of physical memory that exists in a “nirvana” state somewhere in the memory of the computer without a virtual address of its own. The memory cannot be accessed by anyone or anything in this state. In order to access it, an application must map part of the object into its own virtual address space. This mapping does make a part of the memory represented by the ExtMem object accessible in a memory window in the application’s own address space.

There is no limit to the number of mappings an application can do. If needed, it can have several mappings active at a time, and add or delete mappings as required. The only restriction is that mappings must not overlap (either in virtual address space or in the memory object itself). Each mappings opens up a view into a part of the memory object, and, depending on how the mapping was performed, the application can read and/or write to the memory as if it were normal memory.

fig2A mapping is defined by the virtual address in application memory (which can be chosen by the application, or picked at random by the OS), the length of the map’s window, and the offset it maps to in the ExtMem object.

There are some caveats though. Most notably, the ExtMem object itself doesn’t have an address. In that sense it should be treated more like a file than a memory block. If an application wants to have permanent references to memory in the ExtMem object, it needs to store them by offset, just like it would with a file. The first offset is zero, so to address the 1000th byte in the memory block, the application needs to reference it by the offset of 1000. Obviously, this offset must be calculated against the base of the mapping’s offset; just like in a file, reading a part of the file into a buffer makes the first byte read the offset zero in the buffer.

As an example, consider the following situation. We want to access byte 3000 of the ExtMem object. We created a mapping that has length 4000 and starts at offset 2000. The resulting address for our byte would be the base address of the mapping plus 1000, since the offset of the beginning is already at 2000.

Downsides of the ExtMem system

If you think now that this all sounds suspiciously like bank switching, then you are right. The method has been used way back in the Home computer age, and even earlier. The Sinclair ZX Spectrum 128K was equipped with twice as much memory as the Z80 CPU could address; the upper 16k of the machine could be swapped between different chunks of the rest of the memory. Similarly, the Commodore 64 used bank switching to address a larger memory than its 6502 CPU could handle. It was the only possibility at the time to add more memory.

This method we employ now is basically the same (with a bit more added comfort).

Obviously, the method is a compromise. A “real” 64 bit system would be better, and much more transparent to use. However, as I already outlined in the beginning, there is a lot of work involved to make AmigaOS 64 bit compatible, and with the method of ExtMem objects, breaking the barrier is possible now as opposed to years down the road.

Who can benefit from ExtMem objects?

Well, every application that, in some way or the other, has to cope with large amounts of data. Even if the dataset is only potentially large (like, for example, a text editor), using an ExtMem object has its advantages. The text editor (or word processor), by its nature, only presents a small subset of the text it is editing to the user. Likewise, a movie editor would only need to have access to a few frames in order to show thumbnails of the movie on a timeline, or display a single frame that the user is working with.

Another example is RAM disk. Plans are currently underway to update the RAM disk to make use of the ExtMem object interface, allowing out-of-the-box usage of those normally unassigned memory blocks without draining the valuable main memory. Since (depending on programmer setting) memory blocks can even be allocated “on-demand” instead of ahead of time, this will make RAM disk have an even lower footprint, on top of making it possible to store larger amounts of data than ever before in it.

It needs to be said that the ExtMem system doesn’t require memory beyond the 4 gigabyte bounds. It can work with normal memory as well, even though that is not its purpose.

So, as you can see, a good number of applications have a natural tendency to only access a very small subset of their memory at a given time. All of these are good candidate for using ExtMem objects to break the memory barrier.