Timberwolf: Progress on an important project

Note: Since this blog is a channel for OS4 developers to tell about their projects, I think it’s a good idea to post something about Timberwolf here, even though it’s not related to Hyperion Entertainment or a specific AmigaOS development.

I think it’s safe to say that Timberwolf (i.e. the port of Firefox to AmigaOS) is an important project for AmigaOS 4, since today, a system that wants to be taken seriously will have to have Firefox in its software repertoire. A lot of people argue that OWB fills in the gap of a modern web browser and think that we should rather concentrate on that and ditch Firefox. However, the Mozilla software is more than a web browser. It’s technology. It offers a platform independent way of writing applications, and AmigaOS can very much profit from all the developments going on in the Mozilla community.

As a web browser, Firefox is cutting edge technology, offering things like html5 and WebGL, In fact, Firefox has become part of the definition of the World Wide Web, driving it’s development. Its importance in that respect matches or surpasses any other browser. It is also still actively developed by a large group of individuals.

As a technology, Mozilla allows the creation of applications that run on a variety of platforms. One such application is, for example, Thunderbird, an email client that also became the de-facto standard on most systems.


So, what about Timberwolf ? After the release of the early alpha preview last year, we’ve been working on getting the source code updated to the new version of Firefox, 4.0. Early versions (up to beta 6) produced rendering errors within the box layout on Windows (I didn’t test the Linux version at that time). Therefore, we decided to wait until a version came out that would at least render correctly (since that is basically what we would have to implement ourselves). When beta 7 came out, the layout seemed correct,  so we started with the Firefox 4.0b7 source code and applied our code changes to it.

This weekend, I got 4.0b7 to fully compile, although the implementation of the rendering code is still a stub. Since the final release version of Firefox 4.0 came out just recently, we decided to try to update from 4.0b7 to 4.0 final. The update worked quite well, although a few kinks need to be ironed out.

This means we now have all the code that will make up the final release of Timberwolf. In the coming days (time permitting) we will start the implementation of the actual rendering engine. We’re not able to give time estimates, but I would guess that we will be able to come up with the next preview version sometime in early summer.

For more information about Project Timberwolf (including screenshots and updates on the progress), visit the page on AmigaBounty.

Hard drive setup for AmigaOS 4.1 Classic

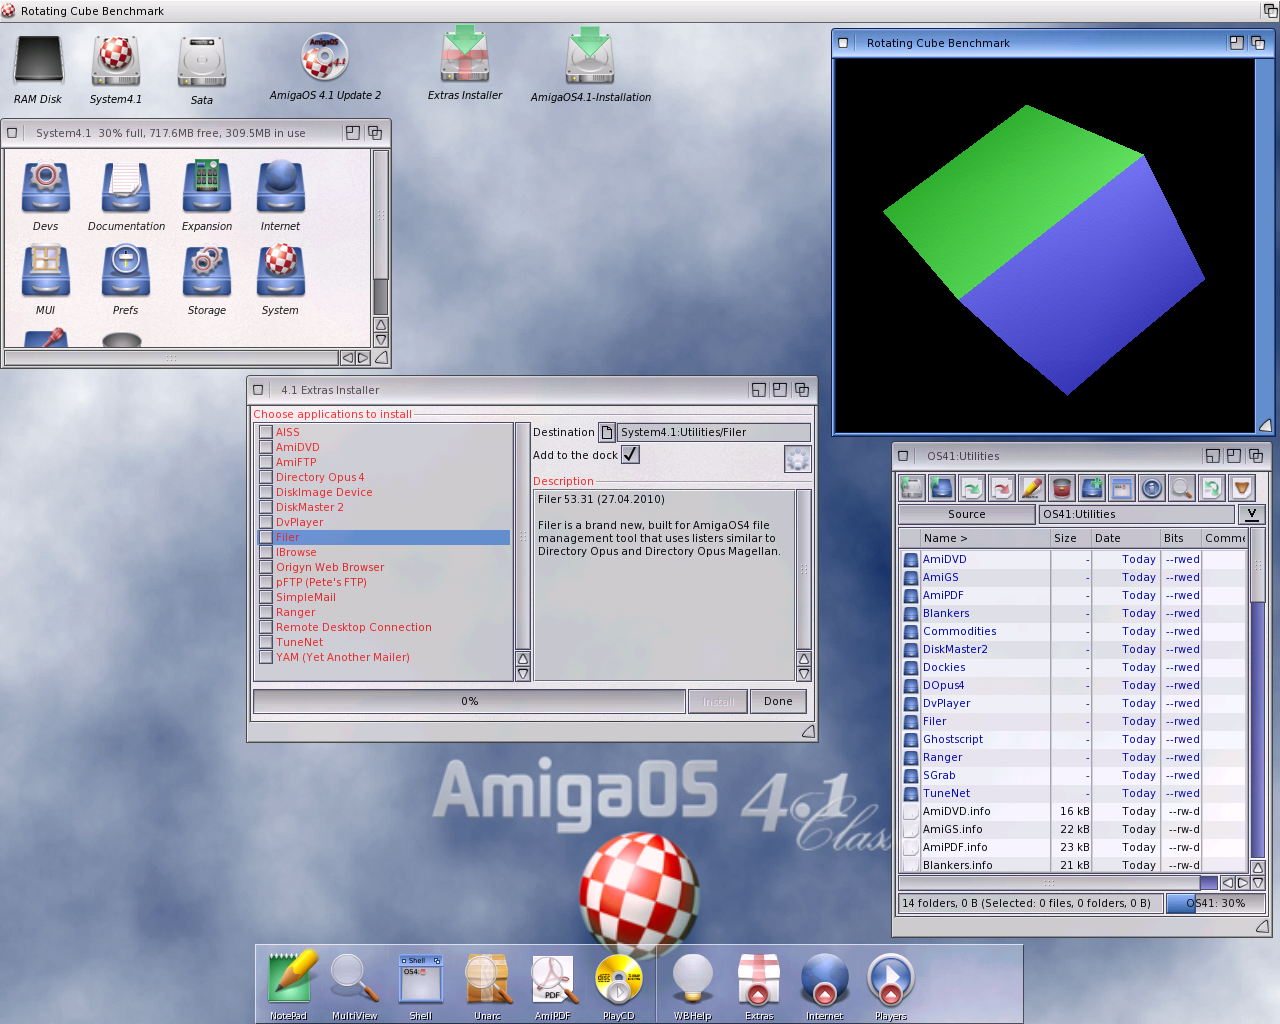
Hi everyone, as we move closer to the release of AmigaOS 4.1 Classic, I wanted to take some time to help you prepare, so I thought I would write this article about how to setup your Hard Disk so you are ready when your CD arrives in the mail!  Make sure you check http://www.amigakit.com and http://www.hyperion-entertainment.biz for the latest news on the release date and ordering information!

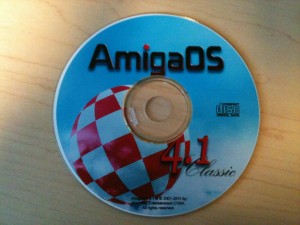
AmigaOS 4.1 Classic pre-production sample Installation Disc

There are a few things you should understand about how the Amiga handles hard disks.  I’m sure many of you are seasoned veterans of the Amiga and already know all of this, but it doesn’t hurt to have it written down clearly.

I’ve broken this article down into several categories to make it easier to read.  After that, we’ll walk through the process of setting up your Hard Disk so it works with AmigaOS 4.1 Classic and boots properly.

The Rigid Disk Block (RDB)

This is basically the “boot block” for the hard disk.  The Amiga will look for the Rigid Disk Block (RDB) at the beginning sectors of the drive.  Inside the RDB is file system information, partition layouts, boot priorities, etc.   In order to boot from a hard disk you must have a RDB.

File Systems

There are three different file systems that are included with AmigaOS 4.1:  FastFileSystem, SmartFileSystem, and JXFS.   Each of these file systems has different types.  For Example, there is FastFileSystem (DOS \ 03), FastFileSystem (DOS \ 07) – sometimes referred to as FastFileSystem 2, SmartFileSystem (SFS \ 00), SmartFileSystem 2 (SFS \ 02), etc.

Each of these “types” of file systems have different characteristics.  Included on the AmigaOS 4.1 Classic Installation Disc is an easy to read table outlining the various characteristics of each of the included file systems.  For now we will keep it simple and say that you will be either booting from FastFileSystem (with long file names) or SmartFileSystem.

Note: For your boot partition you can use FFS or SFS, but many users choose SFS because it is faster than FFS, does not require long “validation” in the event of a disk error , and is more efficient compared to FFS.   Keep in mind, though that FFS has good recovery tools, while SFS recovery options are more limited.  But even with such limitations the speed and efficiency of SFS probably out weighs the lack of recovery tools for most users.

Partitions

Most users divide their hard disks into one or more partitions.  For AmigaOS 4.1 we are recommending at least three partitions.  One for the Operating System, one for a SWAP partition, and one for a Work partition.  Of course you can have many partitions, but for most users three will be sufficient.

Swap Partitions

What is a swap partition?  Well, starting with Amiga OS 4.1 Classic, the Operating System kernel can take advantage of using a ZorRAM memory card, or a swap partition on the hard disk to gain extra memory.  If you only have 128MB on your Cyberstorm PPC (the maximum) you will be happy to know the system can access additional memory by using the swap partition (or ZorRAM card).  Amiga 1200 owners with Blizzard PPC cards are lucky – they can put 256MB of RAM on their CPU cards, which lessens the need for a SWAP partition.  All of this is explained in the Classic FAQ that is included on the Installation Disc so I won’t go into the details here.

Hard Disk Limitations

The device drivers inside the Amiga’s ROM are pretty old now – almost 20 years!  Back then 4GB hard disks were very expensive and not so common.   So we have some limits on where your boot partition can reside.  For AmigaOS 4.1 Classic you must place your boot partition fully inside the first 4GB of your hard disk. If you don’t, your Amiga will most likely crash when it tries to start.  The old device driver in the ROM doesn’t understand spaces beyond 4GB.   But since AmigaOS 4.1 Classic consumes less than 500MB of hard disk space, even a 1GB System or Boot partition is enough.   You will be fine as long as you create your boot partition inside the first 4GB of your hard disk.

Hard Disk Setup

Ok, now that we have the basics down, let’s walk through preparing your hard drive for AmigaOS 4.1 Classic.

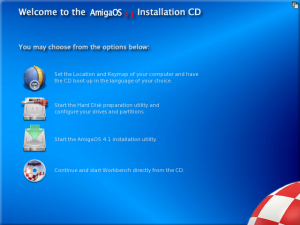
When you boot your Amiga with the boot floppy and Installation Disc, you will be presented with a Welcome screen that will allow you to, among other things, start the hard disk  preparation utility to configure your hard disk and partitions.

This is probably the first thing you should do, because when you make changes to your hard disk you will have to reboot to enable the changes.

A word of warning before we continue! Make a backup! You will be adjusting the hard drive partitions, RDB, and file systems, which can mean data is erased. So have your backup completed before doing anything else.

Ok.  Let’s get started then.

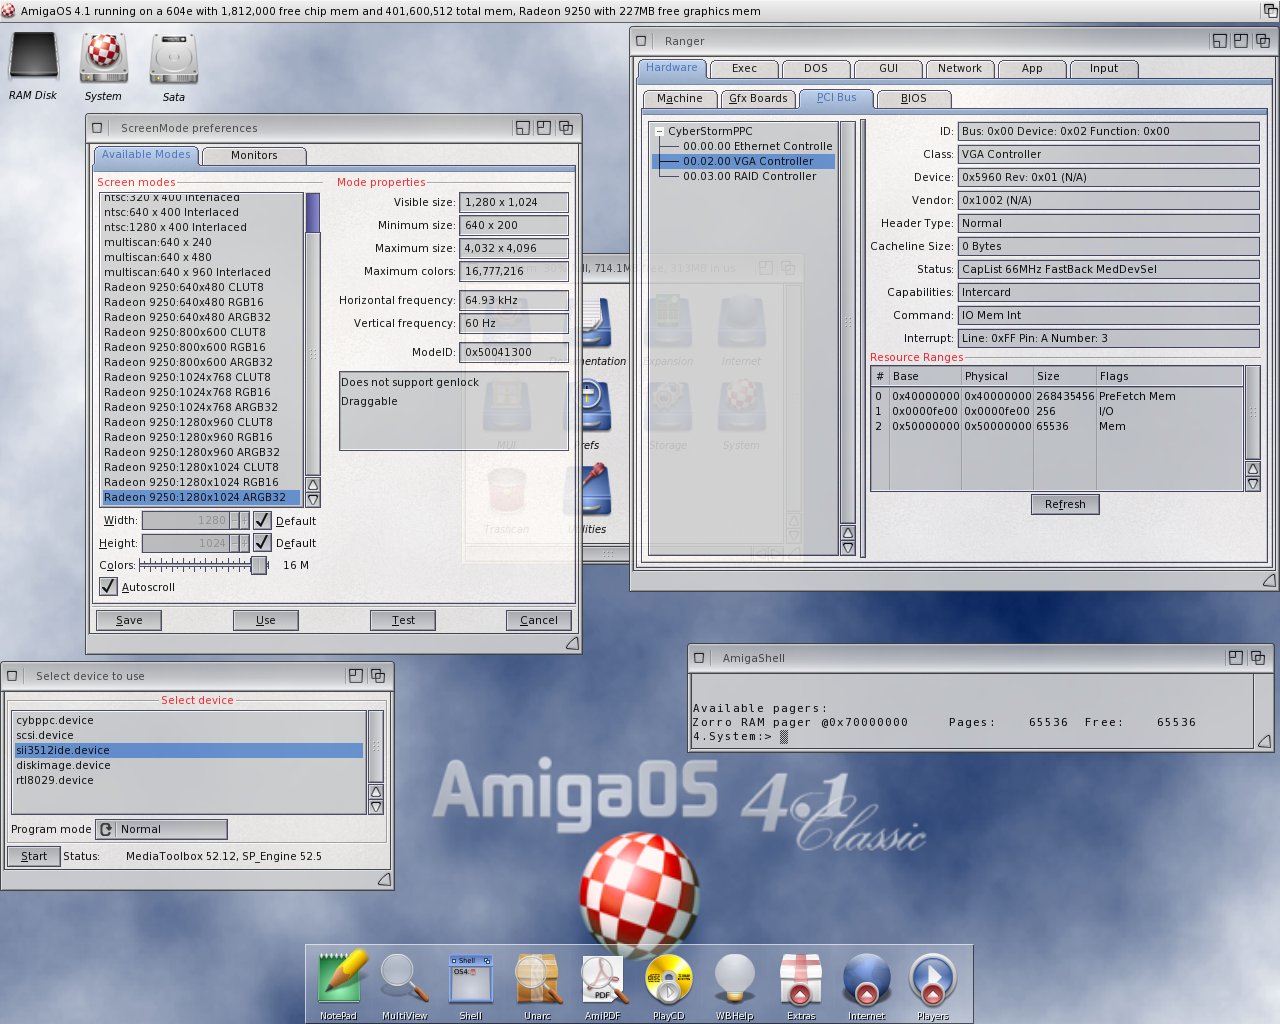
After the AmigaOS 4.1 Classic welcome screen appears, select the second option, which is to configure drives and partitions.

This option starts Media ToolBox, which is the new Hard Disk preparation utility introduced in AmigaOS 4.0.

When Media Toolbox starts, it will ask you to choose your device.  In our example of an Amiga 4000 using the Cyberstorm PPC SCSI controller, you choose cybppc.device.

Note: If you are using an IDE hard drive on the Amiga 4000(T) you would choose scsi.device.  Same for the Amiga 1200.

If you are using a brand new hard drive, never before used, or you wish to erase your entire drive and start fresh, you should click “Edit RDB/Install”, and then “Install/Read configuration…”.    Be Careful here!  This operation will destroy all data on the disk and lay down a new blank drive configuration on your hard disk.  After doing this you will have to reboot, boot with the Boot floppy and Installation Disc again and go back into Media Toolbox to continue.  If you are using an existing hard disk and just want to make space available at the beginning of the drive for your AmigaOS 4.1 Classic installation, just go directly into the Editing of partitions and do not Install a new drive!

Once back in Media Toolbox, select your device, then click on “Edit partitions and filesystems”.  If you have started from your newly erased drive, you must now add a file system to the RDB, add some partitions, and check some other settings.

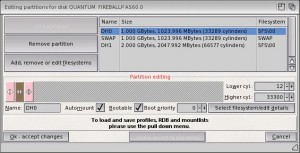
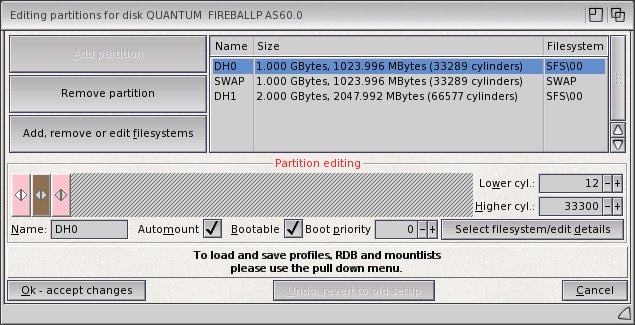
The photo above shows a properly configured drive using the Cyberstorm PPC SCSI controller, a boot partition DH0:, a SWAP partition set to AutoMount, and Work partition, DH1: and lots of empty unallocated space.

Okay, you have made it pretty far! Next you add the file system to the RDB.

Adding a file system into the Rigid Disk Block (RDB)

On the “Editing partitions…” screen, select “Add, Remove, or edit filesystems”.

Click on “Add new FS”

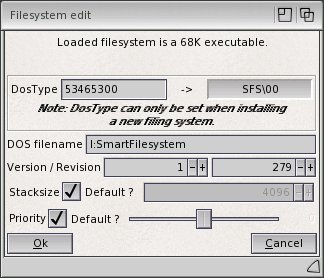
Browse to the L: directory (of the Installation Disc) and choose either SmartFileSystem or FastFileSystem.  Let’s pick SmartFileSystem for this example.  After you pick SmartFileSystem from the ASL requestor, you will be presented with a “Filesystem edit” screen.

It is very important in this screen to type the correct DOSType for your file system! This is one of the most common “gotchas” for setting up your hard disk.   For SmartFileSystem we have to change the “DosType” field from the default of 444f5303 to 53465300.  Once you do that, press enter, and you will see the name become SFS \ 00, which is the proper identifier for SmartFileSystem.

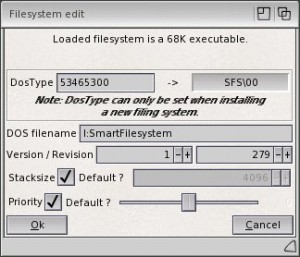
The above picture shows the proper settings for SmartFileSystem.  Note the DosType.

After you have selected the File system, changed the DosType, you can click “OK – Accept Changes”.  The hard part is now done!  The file system has been placed inside the RDB.

Adding your Boot, Swap, and Work partitions

Okay, let’s add your Boot partition.  Click on a blank area of the disk (they greyed out horizontal bar) so it is selected.  Click  “Add partition”.

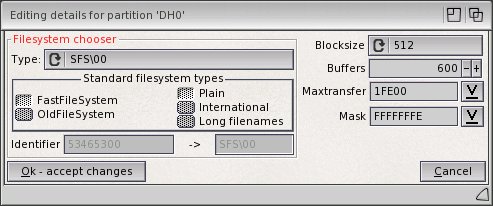
By default, Media Toolbox will add a DOS \ 03 partition shown in a green colour, but we don’t want that, since DOS \ 03 doesn’t support long file names and won’t work for a Boot partition.  We need to change the File System type to SmartFileSystem.  Click on the “Select filesystem/edit details” button.

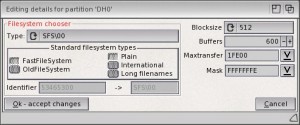
A properly configured SFS partition

In the “Type” chooser select SFS \ 00 from the list.  Change the Blocksize to 512.  Everything else is fine to leave with the defaults.   Click “Ok – accept changes”

You’re back at the “Editing partitions…” screen now and you should see your boot partition taking up the entire drive in the colour pink!  One final – and important step!  Use the arrows to shrink your partition so it resides INSIDE THE FIRST 4GB of your hard disk.  It should be right up against the LEFT edge of the hard disk.  1GB should be sufficient! Look at this photo again showing a Boot partition of 1GB:

A properly configured drive with Boot, Swap, and Work partitions.  The greyed out area is unallocated.

Next, we verify that the  “Automount” and “Bootable”  options both have check marks as shown in the photo above.  Set the Boot priority to zero.  You can adjust the priority to ensure it has a higher priority than other bootable partitions (if you had any), but if you have no other disks or bootable partitions, zero is fine.

Note: If you plan on having multiple boot partitions for AmigaOS 3.9 and AmigaOS 4.1, ensure they are created INSIDE the first 4GB of the hard disk layout and set a higher Boot priority for the partition you wish to boot from when your Amiga starts.

Adding the SWAP partition

Again, click on a blank area of the disk (the greyed out section), then click on “Add partition”.  You will again see a green area now on the disk, so let’s change the partition type to SWAP.   Click on “Select filesystem/edit details” and change the Type to SWAP.  We don’t have to change anything else, so just click “OK – accept changes”.

Your partition layout should now show a large brown partition.  Shrink it so it is no more than 1GB in size.  Anything more than 1GB doesn’t really make sense.  One final step – set the SWAP partition to “Automount” by making sure the check box has a check mark on it.

Note: At the time of this writing a SWAP partition on the Amiga’s IDE controller (scsi.device) is not supported.  So please do not put a check mark on “Automount” if you are using an IDE hard drive on the internal IDE controller.  This may change in later OS updates.  For the initial release SWAP partitions are only supported on cybppc.device (Cyberstorm PPC SCSI) and hard disks connected to supported PCI SATA controllers.

You are almost done!

Add a Work Partition

The final step is to add a Work partition.  The procedure is the same.  This time we will change the file system to JXFS.  JXFS can handle very large file and partition sizes, – (see the File System Table on the AmigaOS 4.1 Classic Installation Disc for further information – it’s in the Documentation directory).

Note: JXFS partitions are NOT compatible with AmigaOS 3.x!  If you dual boot with 3.x and 4.1 you should choose SFS instead of JXFS for your Work partition.

Click on a blank area of the disk (the greyed out section), then click on “Add partition”.  You will again see a green area now on the disk.  Click on “select filesystem/edit details”. Change the “Type” to JXF4 and the Blocksize to 512.  Click “Ok – accept changes”.  You should now see a purple area on your disk.

That is basically it! Check everything over – verify you have your file system in the RDB, verify you have your Boot partition inside the first 4GB of your hard drive, check that “Bootable” has a check mark for your boot partition, check the boot priority is set to zero unless you have other boot partitions (adjust it accordingly – higher priorities boot first).

Click “OK – accept changes, then click “Save to Disk”.

You will be prompted to reboot your Amiga.

Start again with the Boot Floppy and Installation Disc, and at the Welcome screen you can choose to Install AmigaOS 4.1 Classic.  Set your Locale and keymap settings first.

When you start the AmigaOS 4.1 Installation and select which partition to install on to, double check it’s the right partition (eg. DH0:) and select to format your partition.   “Quick Format” is recommended.  Enable Long Filenames if you are using FastFileSystem.  After the Installation has completed copying all of the files, remove the Boot Floppy and Installation Disc, power off your Amiga, then power back on and your Amiga will boot into AmigaOS 4.1 Classic!

PS – Don’t forget to format your Work: partition once you have booted into AmigaOS 4.1 – it will show up as “uninitialized” disk on the Workbench.

Follow the Post Install instructions to setup your Sound, Network, and Graphics and start exploring!

Darren Eveland
AmigaOS 4.1 Classic Beta Tester

Note: this information is pre-release and preliminary.  Subject to change when the final product ships.

Getting your Amiga ready for AmigaOS 4.1 Classic

So, you have your Amiga with Blizzard PPC or Cyberstorm PPC and you want to get ready for the day your AmigaOS 4.1 Classic CD arrives!  There are a few things you should take into consideration prior to installing AmigaOS 4.1 for Classics.  What should you do to prepare?

1) Let’s talk about the minimum system requirements and the recommended system requirements:

The minimum requirements are:
  • An Amiga 1200, 3000(T), or 4000(T) with Blizzard PPC or Cyberstorm PPC accelerator card
  • Minimum 128MB memory installed on Blizzard PPC or Cyberstorm PPC
  • Kickstart 3.0 ROMS
  • IDE or SCSI CD-ROM drive (on Cyberstorm PPC) for installation
  • 1GB hard disk drive on IDE internal port or Cyberstorm PPC SCSI
  • Amiga 880K Floppy Disc Drive
The recommended configuration (in addition to the minimum) is:
  • Prometheus or Mediator PCI BusBoard with a compatible Radeon graphics card
  • RTL8029 based PCI Network card
  • ZorRAM 128MB or 256MB Zorro 3 Memory card (or other compatible Zorro 3 memory card) (Amiga 3/4000 only)
  • 20GB or larger hard disk drive on Cyberstorm PPC SCSI or internal IDE port
  • 256MB RAM (Blizzard PPC only)

2) Make sure your machine is in good condition.

How much dust is in your machine? Maybe it’s time to clean the inside – and make sure you take anti-static measures at any time you have the case open.  Blow that dust out, get your machine cleaned up, make sure all cards are properly inserted.   Be very careful working inside your machine and if you are unsure about anything talk to your local user group, post on a forum, or contact an Amiga Dealer.  Inspect for any capacitors that may be leaking – they are normally the small round silver and black components.   Amiga 3000 and 4000 users should inspect the battery – the “barrel” shaped component – those can also leak, too.  Many users have chosen to remove the batteries altogether to prevent any possibility of leakage.

Check the fans in your computer.  Are they dust free? Are they making whining noises? Cooling, especially of the PowerPC processor, is critical.  If you have never replaced the fan you may want to consider installing a new fan.   If you are not comfortable doing it yourself, contact your local user group or Amiga Dealer for assistance.  Again, take all and every precaution working inside your computer.  Take your time and don’t make any quick decisions.  Think about everything you are doing inside the case.

Is everything working fine under AmigaOS 4.0 or AmigaOS 3.9?  It will be best prior to installing AmigaOS 4.1 Classic that you know your machine is fully working.  Make sure your floppy drive works.  Can you successfully format a floppy disk?  Can you copy files to your floppy and delete files?

3) Verify your PPC processor is working

AmigaOS 4.1 for Classics requires that all of your hardware is fully functioning.  That means that your PowerPC CPU must be operational.   Some of you may not even know if the PPC chip is actually working.  There is an easy way to test this.  You can download the PPC-Test floppy disk from here: http://powerup.amigaworld.de/index.php?lang=en&page=24.  This is a floppy disk that you can boot from  to test the operation of the PowerPC CPU.  Both tests should come back with “OK” if the PPC CPU is working.

You may already have AmigaOS 4.0 or AmigaOS 3.9 installed.  AmigaOS 3.9 came with optional PowerPC support.  If your existing PowerPC applications are working then you will be fine.

4)  Take some time to think about what partition or disk you will install AmigaOS 4.1 Classic on.

You will have to install on a blank partition, and that partition should be inside the first 4GB of the drive space due to limitations on the original scsi.device of the Amiga 1200 and 3/4000.   Have your partition or drive in mind, and make sure you understand how to set partitions as bootable, how to put file systems on the disk, what an RDB is, etc.   There will be information on this in the “Installation Guide” that will ship with AmigaOS 4.1 Classic.  In the meantime, it may be helpful for you to read up on this now.  There is much information available on this on the various Amiga Community forum websites.  (Don’t worry, the AmigaOS 4.1 Classic Installation Utility will also walk you through this).

5) Think about what hardware you have and if you want to get the best experience possible with AmigaOS 4.1 Classic.

Do you want to use a Radeon card? If so, you will need a Mediator or Prometheus PCI bridge.  Both of these are still for sale as new from Amiga dealers.

6)  Get involved.

Talk to other users.  Share your experiences.   Participate and read the forums – there is a wealth of information on Amigas out there.    We are a small community so everyone’s participation is helpful and contributes to the overall success of the platform.

7) Last of all, have fun!

We are making this release so you can enjoy your machine and keep your Classic up-to-date.  You may move on or up to a Sam 460 or X1000 later, but that doesn’t mean that you can’t still enjoy using your Classic machine for many years to come!

Before I sign off on this post I just want to say “Thank you” to all of the users out there!  Thanks for the positive comments and thank you to the entire Amiga Community for keeping the spirit alive.  Without everyone’s hard work and dedication none of this would be possible!

Darren Eveland

AmigaOS 4.1 Classic Beta testing started

Beta testing of the AmigaOS 4.1 version for Classic Amigas has now started. Participants have been contacted by email. If you asked to participate, but did not get the appropriate email, please contact me again (thomasf@hyperion-entertainment.biz).

Blog Comments

Unfortunately, due to massive spamming of advertising comments on the blog, we were forced to disable commenting entirely. It has become way too much work to moderate all spam and advertisement. Since we want to continue keeping you informed instead of having to sift through comments, disallowing commenting was the only viable option.

Thank you for your understanding.

AmigaOS 4.1 Classic Promo video (unofficial)

Hi everyone and Happy New Year!  I made a video some time ago about AmigaOS 4.1 Classic to act as a little “teaser” and I wanted to show it here.  It’s not an “official” video, just something put together by me, but in any case I hope you enjoy it!

Again I would like to point out it shows some beta features that may not be in the final version (such as the total memory display in the Workbench Title bar that I am using for debugging/paging tests).

As for the release date, that is always subject to change as we are in the thick of final development now.

I will have further blog entries in the coming weeks as we get closer to the release date of AmigaOS 4.1 Classic.

Here’s the Youtube link to the video:

AmigaOS 4.1 Classic Promo video

Oh, and turn up your speakers! 🙂

Quick video of AmigaOS 4.1 Classic in action

Hi everyone!  I made a quick video of AmigaOS 4.1 Classic (beta) in action and wanted to post it here.  Some of you have asked to see it actually running, so this gives you a little bit of an idea of the performance on an Amiga 4000 with Cyberstorm PPC and the Radeon 9250.

This is running on a different machine…not the same one as the screenshots were taken on, so it may look a bit different than the screenshots I posted earlier.  I have a SWAP partition on the cybppc.device so you will see that there is extra memory shown in the Workbench title bar.  (The displaying of swap memory in the Workbench title bar is a developer option and may be removed from the final version.)

I had to upload it to Youtube since the video was too big to post directly here.  Link is below, enjoy!

Quick video of AmigaOS 4.1 Classic

Darren Eveland
AmigaOS 4.x Beta Tester

About this Blog

Welcome to the new Hyperion Entertainment Developer Blog.

On these pages, we intend to inform you in irregular intervals about new developments on AmigaOS 4.x, what is going on and what is being worked on right now. To begin with, we’ll have some news and a sneak peek at the Classic version of AmigaOS 4.1 that is going to be released soon.

To make full use of this, you need a CSS-Capable browser. Users of AmigaOS 4.x can use either OWB or the Timberwolf Alpha release. Older browser like IBrowse will very likely not display most of the content correctly.

There is more to come; watch this space.

AmigaOS 4.1 Classic Sneak Peek

Hi everyone, my name is Darren Eveland and I’m one of the AmigaOS 4.x beta testers.  I’ve been on the Beta Testing team since 2003, and I’ve tested AmigaOS 4.0 through 4.1.  My current focus is testing AmigaOS 4.1 for Classic Amigas.  Hyperion announced AmigaOS 4.1 for Classic Amigas at this past Amiwest in California, and that was a few months ago, so I wanted to take this opportunity to give you a sneak peek of what’s coming.

We are working very hard to “catch up” AmigaOS for Classic Amigas since we know it hasn’t been updated like the AmigaONE and SAM versions, and we know you’ve asked for it.   So the Classic release will fix that, bringing your Amiga 1200, 3000, or 4000 to the current AmigaOS 4.1 Update 2 level.  Of course it wouldn’t be fun if we didn’t add some new features, too!

So, lets re-cap what Hyperion Announced at Amiwest:

AmigaOS 4.1 for Classic Amigas, equipped with Cyberstorm or Blizzard PPC accelerator boards
Support for Radeon PCI graphic cards – (assuming you have a Mediator or Prometheus PCI bridge)
Support for PCI SATA cards
Support for ZorRAM memory expansion cards (Zorro 3 only)
Support for additional memory via hard-disk paging from PCI SATA hard disks or Cyberstorm PPC SCSI disks
Support for Graphics Hardware Acceleration via the Radeon card – for Desktop Compositing (transparency) and Warp3D

Ok, I know more was said, and there may be a few surprises, but let’s show you a little sneak peek…(and yes, this is beta, so features are subject to change.)

Screenshot of the upcoming AmigaOS 4.1 Classic release

This screenshot shows the AmigaOS 4.1 Classic Workbench, running on an Amiga 4000 with Cyberstorm PPC, Mediator 4000Di PCI bridge, Radeon 9250 with 256MB video ram, a 200GB SATA hard disk, a ZorRAM 256MB Zorro-3 memory card, and the Ranger system diagnostic utility open.

The next screenshot below shows a rotating 3D cube benchmark using hardware acceleration, the new and updated Extras Installer, and one of the included Extras, Filer, a file management utility designed specifically for AmigaOS 4.1.

Screenshot of the upcoming AmigaOS 4.1 Classic release

Many users often wonder “what’s going on”…well as a Beta tester I can tell you that work is completed every single day, there are many e-mails sent between the developers and beta testers, and sometimes we even get into heated arguments about features or implementations.  But it’s all good fun and we are all working very hard to give you die-hard Amiga users something fun and new for your Classic Amigas.  Keep the faith and check back here for more updates as we get closer to release!  The next post will be some tips on what you can do to get your Classic Amiga ready for AmigaOS 4.1 Classic!

Darren Eveland
AmigaOS 4.x Beta Tester